

That's why a sample can cost many times more per piece than the same part in production. The good news is that much of that setup is paid once. Here's what a sample fee usually covers, why the per-piece price looks the way it does, and how to keep it reasonable.
What a Sample Fee Usually Covers
Glass. Suppliers usually start with more glass than you ordered, sometimes about double, because some pieces will be lost along the way to breakage, chips or print rejects. Special glass, such as a branded aluminosilicate or etched anti-glare glass, costs more to begin with.
CNC fixtures and programming. To cut, grind edges and drill holes accurately, the CNC machine needs a fixture that holds your exact shape, plus a program for the outline and holes. Both are made specifically for your part.
Machine setup. Every step (cutting, edging, drilling, printing, coating) needs to be set up and checked before the first good piece comes out. One glass manufacturer notes that setting up for a complex part can take half a day, while running each piece may take only about 10 minutes.
Strengthening. Chemical strengthening takes about 5 to 8 hours per batch, and different products can't share a batch. Your samples occupy a full furnace run, including the energy and salt it uses, however few pieces there are.
Printing screens and films. Each color, and each print layer, needs its own screen and film. A black border plus a white logo means two screens; add a gray icon and it's three.
Coatings. Anti-reflective and anti-fingerprint coatings need their processes adjusted for a new part, which carries its own setup cost.
Inspection, packing and shipping. Samples are checked, packed with protective film, and usually sent by air courier, which costs more per piece than sea freight in production.

Why the Per-Piece Price Looks So High
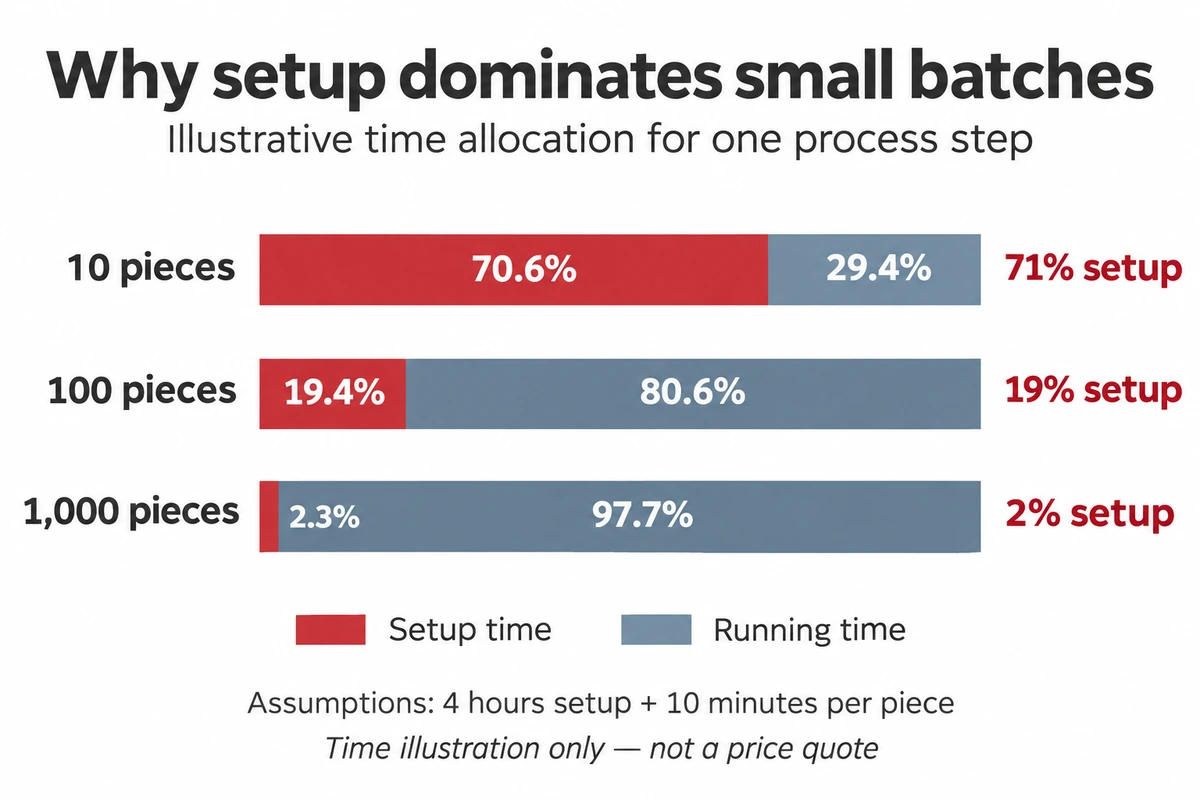
The easiest way to see it is through time. Take that manufacturer's example of about half a day of setup and about 10 minutes per piece, and assume four hours of setup for one process step:
- For 10 samples, setup takes 4 hours and running takes about 100 minutes. Setup is roughly 70% of the time.
- For 100 pieces, running takes about 17 hours. Setup drops to under 20%.
- For 1,000 pieces, running takes about 167 hours. Setup becomes about 2%.
The same pattern repeats at every step that needs setup, and again for one-time items like fixtures and screens. Spread over ten pieces, those costs dominate. Spread over thousands, they almost disappear.
This is an illustration, not a quote. Real setup and run times vary a lot with the part and the factory. But it explains why ten samples can cost nearly as much as a small production run.
One-Time Costs vs Costs You Pay Every Time
It helps to split a sample quote into two groups.
One-time costs are paid once for a given design:
- CNC fixtures and programs
- Printing screens and films
- Initial coating setup
Repeating costs come back with every order:
- Glass
- Machine time and labor
- Strengthening runs
- Inspection, packing and shipping
When you reorder the same design, you shouldn't pay the one-time items again. When you change the design, it depends on what changes:
- A different border color or logo usually needs only a new printing screen.
- A different border width needs a new screen, and maybe a new film.
- A new hole, a moved cutout or a different outline usually means a new CNC fixture and program, and often new screens to match.
So the cheapest changes are cosmetic, and the most expensive ones change the shape. Settle the outline and holes first, and leave colors and graphics for the next round if you need to.
Ballpark Figures
Suppliers rarely publish prices, and costs vary widely with size, glass and complexity. One display module maker gives a rough figure: about $1,500 for tooling when only the top cover is customized on a standard touch sensor, and $4,000–$10,000 when the touch sensor pattern is customized too.
Treat those as a sense of scale, not a benchmark. The figures come from one company's marketing and include touch panel work, not just glass. For a plain custom cover glass, ask for an itemized quote.
Ways to Keep Sample Costs Down
Use standard glass and thicknesses. Common thicknesses such as 0.7, 1.1 or 2 mm, in glass the supplier already stocks, avoid special purchases.
Keep print colors to what you need. Each extra color adds a screen and a print pass. A single black border with a knocked-out logo is far cheaper than a multi-color design.
Fix the shape early. Shape changes are the expensive ones, so make sure the outline, holes and corner radii fit your housing before ordering samples. A quick 3D-printed or laser-cut mock-up can catch fit problems cheaply.
Don't add every coating in round one, unless it affects the decision. If you only need to check fit and looks, the AR or AF coating can wait. If you're judging glare or touch feel, include it.
Order a few extra pieces. Breaking a couple of samples in a drop test or fitting trial is normal. A few extra pieces cost little once setup is paid, and they're much cheaper than a second sample run.
Allow a normal lead time. Rush orders can mean overtime and rescheduling, which suppliers often charge for.
Questions to Ask Before You Pay a Sample Fee
- Is the quote itemized, so you can see glass, fixtures, screens, strengthening and coatings separately?
- Which items are one-time, and will you pay them again when you reorder?
- Is any part of the sample fee credited against the first production order?
- How many pieces will you receive, and how many extras are included?
- What is the lead time, and what would a rush cost?
- If you need a revision, which changes are cheap and which need new tooling?
- What inspection data comes with the samples, such as dimensions or strengthening readings?
A supplier who answers these clearly is usually one you can work with in production too.
If you'd like a sample quote broken down line by line, send us your design and quantities, and we'll show you where the cost goes.